3/17/2021

Spring Planting Checklists to Maximize Yield Potential

Something went wrong. Please try again later...
Checking spring planter

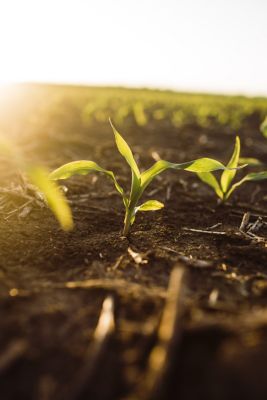
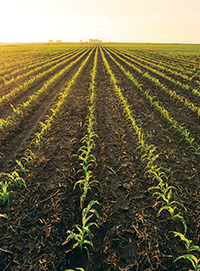
It's just about time for spring crop planting. When is the optimum time to plant spring crops? And how do you position your field for favorable spring crop emergence? We’ve got spring planting checklists to help you make the most of every acre from the start.

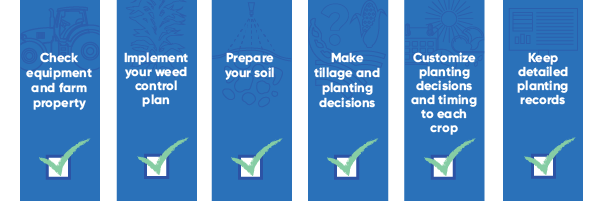
Advance planning for spring row crop planting is critical. Research has consistently shown that delays in spring crop emergence can cause average yield losses as high as 9%, and failure to time crop planting during optimum windows can reduce yields by as much as 15%.

Use this planning checklist to help you get your growing season off to a stellar start. Your retailer is a great resource to help you customize plans to your operation. Be sure to also ask your retailer these 7 questions to inform your crop protection planning as you kick off the season.

1. Perform a planting equipment check

Planting success with your spring crops requires well-maintained equipment that’s ready to hit the ground running when the growing season starts. Take time now to inspect planting equipment and technology, make repairs, and institute upgrades. Follow these equipment prep checklists to get started.

Row crop planter inspection

  • Check the planter toolbar and parallel arms for proper alignment to prevent seed placement issues. Everyday usage can cause wobbling and misalignment. Be sure to replace bushings, bolts, and arms if you see significant wear.
  • Inspect double disk openers and depth wheels. Test to make sure there is good contact between the double disks. In general, the disks must be replaced when they lose 1/2 inch in diameter. Check with depth wheels for cracks and wear. Wheels should run tight against double disk openers to ensure seed furrow does not collapse. Check the depth wheel arm bushings and replace if needed.
  • Inspect seed tubes and vacuum for obstructions, leaks, and loose fittings, and continue to do this regularly throughout spring planting season. Clean seed tube sensors routinely, and make sure to adjust vacuum pressure according to seed size and shape.
  • Adjust coulters and row cleaners to avoid soil disturbance and creation of air pockets in seed furrows during planting.
  • Consult your planter owner’s manual for make and model-specific seasonal maintenance.

General spring inspection

  • Inspect fertilizer equipment for properly functioning microtubes, splitters, and pumps, and be sure to remove any old residue from last season that might clog nozzles or result in uneven application of fertilizer.
  • Perform a safety and technology check on all planting equipment to make sure lights and signals work properly so you don’t risk accidents when moving from one farm or field to another and to ensure all your equipment technology is up to date.
  • Check tire pressure on tractors and other field equipment to avoid compaction when planting. Generally 8 to 10 psi is ideal for most 4WD tractors, but consult the manufacturer’s recommendations. You should check and adjust tire pressure every two weeks.
  • Survey field conditions. Check your farm properties for new potential equipment hazards; fences, gates or roadways that need repair; areas with potential erosion and gullies; and excessively wet areas that may indicate plugged tile lines. This is also a good time to check the weed pressure of fields.

2. Start implementing your weed control plan

  • Review your weed control plan with your retailer. Remember the hard and fast rule of raising row crops — you absolutely must start clean and stay clean. Unchecked weed pressure (even slightly unchecked weed pressure) can slash yield potential. It can also build up the soil weed seed bank — reducing the yield potential of future growing seasons. Talk to your crop protection retailer to help you make an effective plan.
  • Consider a burndown. If you didn’t apply a herbicide after fall harvest, now might be a good time to apply a burndown treatment, such as Elevore® herbicide. This is especially critical if your operation is no-till. Be sure to check the product label for your burndown herbicide and follow recommended crop rotation intervals. Elevore can be applied up to 14 days before planting soybeans, corn or wheat. Plan ahead to apply your burndown treatment early enough to meet optimal planting windows.
  • Plan for preemergence applications. To stay clean, consider a residual pre-emergence application, alternating modes of action where possible to help keep the weed pressure in check. Weeds are much more difficult to control post-emergence. Be sure to apply under the right weather conditions to prevent crop injury. Your crop protection retailer can help you select the right modes of action for your corn herbicide, soybean herbicide or wheat herbicide residual applications based on your specific weed pressure and geography.

3. Prepare your soil

If you want optimal growing conditions for your spring crops, you’ll need optimum soil health. The health of your farmland soil depends on three critical factors: physical structure, soil composition , biological composition (ideally hosting a diverse array of microorganisms) and chemical makeup (the nutrients and minerals it contains).

Make sure your farmland is in capital shape for spring crop planting with these spring soil preparation tips:

  • Start with a soil test. Before you add any soil amendments, understand what shape your soil is in. Work with reputable soil testing facilities to collect and submit soil samples. Remember, if you collect samples on your own, get those samples to the lab as soon as possible.
  • Adjust soil pH if needed. Healthy soil generally has a pH between 6 and 7. This pH range best supports soil microbial activity that will give your spring crops the best access to nutrients. Remember, you should work with a soil testing company to determine the correct amount of lime (for low pH soils) or sulfur (for high pH soils) needed in your field.
  • Consider your soil’s nutrient load. All row crops need nitrogen, phosphorus, and potassium, but different crops need them in different amounts. Too little fertilizer can limit crop yields, while too much can be a waste of money.

    For your corn acres, the key to a successful spring nitrogen application is choosing the right fertilizer type, nitrogen stabilizer, application rate and timing. Given spring and early summer are prime times for nitrogen loss in the soil, applying a nitrogen stabilizer is critical. During a wet spring, the risk of nitrogen loss increases dramatically.

    In most cases, rhizobium bacteria should be adequate to supply the nitrogen needs of your soybean crop. However, where fields have sat fallow/absent of beans for extended periods of time, it may be worthwhile to inoculate. With soybeans, potash rivals nitrogen for representation within the plant by weight. Consider an application of potash prior to planting beans. Consult your crop protection retailer for advice on a nutrient application strategy for your specific row crops.
  • Take soil moisture into account and plant spring crops accordingly. Make sure you understand how moisture can impact spring crop emergence and yields. Planting into soils that are too wet can cause sidewall compaction and smearing, which can restrict root development and harm yield, especially if soil dries out later in the summer. If your soil is too moist, it also can cause fungi to proliferate, potentially leading to root rot.

4. Make tillage and planting decisions

When it comes to planting spring crops, timing is key, but it’s not everything. Carefully consider seed depth, spacing, density and population. All of these factors will promote the uniform emergence that is so critical to higher crop yields in the fall. Here are a few best practices for spring crop planting:

  • Minimize tillage if possible. As residue decreases, the moisture-conserving and erosion-preventing benefits of that residue also decrease. Conserving soil is always important, and it becomes even more imperative where top soil layers are already shallow. Always beware that every trip across the field also increases the chances of compaction-related issues. Ohio State University Extension research has found that compaction could lead to as much as 15% of crop yield being left in the field.
  • Plant as close to the optimum planting window as possible for your spring crop and geographic location to ensure maximum yield potential. Weather is the biggest factor affecting planting dates, so check this spring weather outlook for 2021 and plan accordingly.
  • Set appropriate seed depths for your crops. Always check the depth settings on your planter. And because row-to-row variability is common on planters, you should also take time to check the seed depth of every row unit across the whole planter. Check again if, once in the field, you notice changes in ground conditions.
  • Plant about 5% more seeds than your target stand to account for germination failure or seedling loss. Note that this should be increased to 10% for no-till operations.
  • Pay attention to seed spacing. Uneven seed drop can be indicative of worn, misadjusted or malfunctioning planter mechanisms that need to be addressed.

5. Customize planting practices to each crop

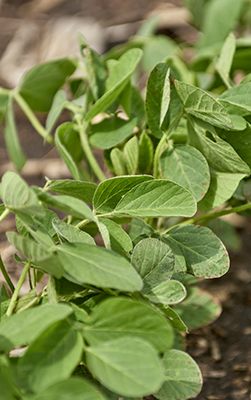
While the above tips provide general guidance on getting spring crops in the ground, there are many crop-specific guidelines to promote maximum yield potential at harvest time. Choosing when to plant and planting during optimum conditions is key. Here are planting checklists specific to three key crops:


Corn

  • Consider seed treatment. Review the pests, diseases and uncertain soil conditions that might affect your corn, and choose a corn seed treatment that will protect your seed investment.
  • Check soil temperature before planting. It should be no cooler than 50°F at 2 inches deep with ever-warming temperatures forecast for the coming days before you plant corn. Extended cold temperatures will leave your seed vulnerable to freezing, along with disease and rot, while the seeds remain in the soil for weeks before emergence.
  • Plant in April if conditions are right. Optimum planting date is April 16 for the central Corn Belt and April 30 for the northern Corn Belt. Use this tool to see the the highest yielding corn planting dates for your state in recent years. Research has shown that yield is maximized when corn is planted within two weeks of the optimum date — but planting four weeks beyond those optimum dates reduced yield by 7 to 15%. The longer you delay planting beyond the optimum window, the higher the rate of yield decline. If you’re in the northern Corn Belt where the growing season is shorter, you are likely to see the harshest yield penalty for late planting. However, it's critical to plant when conditions are fit, even if that means delaying past the optimum date.
  • Plant when there is no rain in the immediate forecast, particularly if soils and the weather forecast are cold. A dry seed soaking up cold water can lead to anything from premature leaf emergence under the soil to seed ruptures that attract insect infestation.
  • Avoid planting when temperatures are widely variable. Even if your soil temperature is optimal and there’s no rain, avoid planting if the forecast predicts wide swings in temperature. Planting in these conditions can impact corn emergence, stunt growth, or lead to uneven stands of corn.
  • Plant seeds at a depth of 2 to 3 inches for most uniform emergence and highest corn yield potential. Corn planted too shallow won't be able to uptake needed water and nutrients, and topsoil variability and temperature may cause problems. Slower planting speeds between 4 to 5 mph will help you achieve more uniform depth.
  • Calculate the ideal population. Consider yield level, hybrid and weather conditions when determining your population. The optimum seeding rate varies from about 30,000 seeds/acre for locations yielding 150 bu/acre to over 37,000 seeds/acre for yields of 240 bu/acre. A plant population that is too high or too low can negatively impact yield depending on whether growing conditions are favorable or stressful. However, modern hybrids generally have a pretty wide margin of error for ideal population, so growers can more confidently plant higher populations that tend to increase yields under favorable conditions.
  • In most cases, stick with 30-inch rows. The majority of U.S. corn is planted in 30-inch rows, and narrowing row spacing rarely produces a yield advantage. If you're in the northern Corn Belt, university research studies have shown that narrow rows can produce an average 2.8% yield advantage.

Soybeans

  • Plant in mid-April to early May in many regions. Many agronomists now say that corn planting time and bean planting time should roll together. The research on negative impacts of late soybean planting is substantial. In the Midwest, for example, data shows that planting after May will result in a 0.7% decrease in yield per day of delay. If the conditions are right, planting in April could boost your yield. Optimum soybean growth is dependent on the shorter periods of daylight in early spring. You’ll want your soybeans flowering before the summer solstice. Check with your retailer or seed company for advice on your region, and use this tool to see the the highest yielding soybean planting dates for your state in recent years.
  • Consider seed treatment. If you're planting soybeans early to increase yield potential, soybean seed treatment is necessary to protect seed from prolonged exposure to soil fungi pathogens and early season insects, and to reduce the risk of soybean sudden death syndrome (SDS).
  • Check your soil temperature. As with corn, you’ll want a minimum soil temperature of 50°F.
  • Beware of frost risk. Soybeans cannot handle the impacts of frost as well as corn can.
  • Consider narrowing row spacingResearch indicates that soybean farmers may be able to capture a 4 bu/acre yield advantage by planting in drilled narrow rows or 15-inch rows compared to 30-inch rows. In lower organic soils and areas prone to drought stress, your likelihood of realizing a benefit from narrowing rows increases. However, factors such as equipment costs, workload management and disease management may offset the potential benefits of narrower row spacing.  

Wheat

  • Begin planting as early as possible, generally from the end of March to mid-April.
  • Check your soil temperature. For wheat, it should be a minimum of 36°F to 40°F.
  • Avoid planting in a loose seedbed. Planting wheat into no-till is ideal. Wheat needs moisture to germinate and will not thrive in loose, dry soil.
  • Plant seeds at 1.5 to 2 inches deep, where the seed will have enough moisture while still emerging timely. Planting too deep increases risk to the seed and can lead to yield losses.
  • Select your seeding rate using the formula “Seeding rate (pounds per acre) = [(desired stand in plants per acre) / (1-expected stand loss)] / [(seeds per pound) x (percentage germination)].” For spring wheat, the desired stand at harvest is around 30-32 plants per square foot (1.3-1.4 million plants per acre).
  • Transfer more weight to the back of the drill to help force seed into the soil. This is especially important if planting in dry, hard soil, as seed-to-soil contact is critical for wheat.

6. Keep detailed planting records

Detailed planting records are important, especially if you're using a herbicide-tolerant trait like the Enlist™ system. It is beneficial to keep detailed records on field locations and share records with those responsible for weed control to ensure the right herbicides are applied to the right herbicide-tolerant traits.

Give your spring crops a better chance at higher yields with our spring planting checklists. And don’t forget to use the knowledge and resources of your crop protection retailer for even more tips and crop- and region-specific guidance. 


Start With a Clean Field

Unchecked weed pressure can slash yield potential. Start clean and stay clean by choosing the right herbicides.

Early corn field at sunrise

Get Power Over Weeds in Corn

Spend less time worrying about unwanted, yield-robbing weeds with our dependable and flexible corn herbicides.

Find the right fit
Soybean close up

Take Control of Your Soybean Fields

Our soybean herbicides deliver the powerful control needed to ease your weed anxieties and help you steward the land.

See the solutions

The transgenic soybean event in Enlist E3® soybeans is jointly developed and owned by Dow AgroSciences LLC and MS Technologies LLC. Elevore®, Enlist Duo® and Enlist One® herbicides are not registered for sale or use in all states. Contact your state pesticide regulatory agency to determine if a product is registered for sale or use in your state. Enlist Duo and Enlist One herbicides are the only 2,4-D products authorized for use with Enlist™ crops. Consult Enlist herbicide labels for weed species controlled. Always read and follow label directions.